Lab Setup
Client-Server Architecture
Since CPUs are not enough for Deep Learning models; we’ll need a GPU. For, that we’ll need Google Colab. Understanding the client-server interaction is crucial for working with such remote code execution environments (here shown as Jupyter Server).
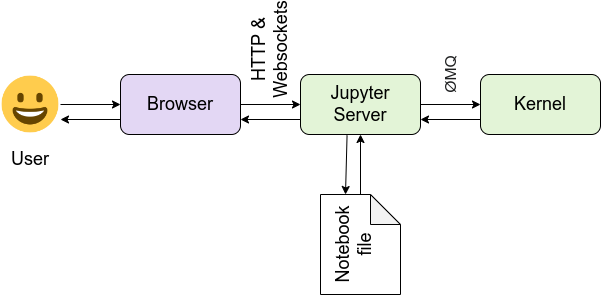
The image above shows how we interact with remote servers, such as Google Colab, to run our code:
- We write code in the Browser Jupyter Notebooks or in VS Code
- On save: the code is sent to the Juypter/Colab Server and stored there as
.ipynbfiles - On run: the code is:
- sent to the kernel for execution
- then back to the server to save the results
- which are then sent back to the browser
Setup Instructions
First, Make sure you have a Google account. And can access Google Colab.
From the original repo, you may:
- Download as Zip then make a new repo
- or Fork the repo (to copy the repo under your username)
- Then, you can open a Colab Notebook and
git cloneit - To save your changes, you’ll have to
git commitandgit push
Use the %cd magic command to move into your specific lab folder. Note that if your folder names contain spaces, you should wrap the path in quotes.
Example for C1_M1_Lab_1_simple_nn you will %cd in the following way:
%cd "/content/W4_DL/C1_M1_Getting_Started/C1_M1_Lab_1_simple_nn"To confirm you are in the correct directory run:
!lsYou should see:
C1_M1_Lab_1_simple_nn.ipynbhelper_utils.py
Optional: Working from inside VS Code instead of the Colab Notebook
Google Colab for VS Code extension allows you to work in VS Code while the code is sent and executed in Colab servers. However, the steps above are still required.