Connecting to Backend Databases
The Hook
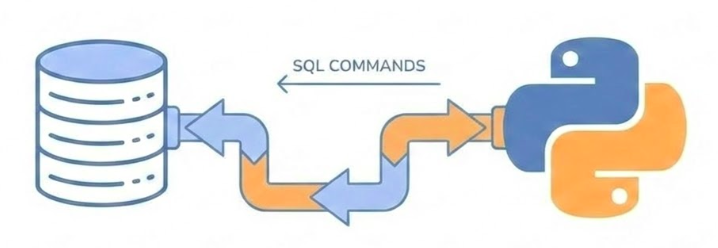
How do I direct my SQL commands to a database system and connect my Python application to it?
We’ve built agents and APIs, but now we need persistent storage. Databases are the foundation of any real application. But how do we get started? We need to understand the environment where databases run, how to set them up reliably, and how to connect our Python code to them. This journey will take us through virtualization, Docker containers, connection protocols, and modern Python frameworks that make database work practical and safe.
Today’s Journey (1/2)
Setting Up the Database
Environment setup and virtualization
Docker containers vs virtual machines
Running PostgreSQL with Docker Compose
Connecting the Application
Using psycopg driver
DB-API 2.0 protocol
Transactions and cursors
Today we’ll cover four major topics. First, we’ll set up a database environment using Docker, understanding the difference between containers and virtual machines. Then we’ll connect our Python application using the psycopg driver.
Today’s Journey (2/2)
SQLAlchemy Framework
Core concepts: Engine, Metadata, Tables
Building queries in Python
Connection pooling
Database Migrations
Version control for schema
Migration scripts with dbmate
Safe schema evolution
Next, we’ll level up to SQLAlchemy, a framework that solves many problems with raw database drivers. Finally, we’ll learn about migrations—the professional way to evolve your database schema without losing data. Each step builds on the previous one.
Part 1: Setting Up the Database
The Problem: Environment Complexity
Software needs an environment
CPU architecture (x86/x64, ARM)
Operating system
Memory and I/O devices
Installed binaries and libraries
Configuration files
The challenge: Conflicts between different software requirements
A database is software—compiled binary instructions that run on hardware. But software doesn’t run in isolation. It needs an environment: the right CPU architecture, operating system, memory, network access, storage, installed libraries, and configuration files. The problem developers have faced for decades is that different software needs different environments, and these can conflict with each other. One project needs Python 3.9, another needs 3.11. One needs PostgreSQL 14, another needs 16. Managing these conflicts manually is a nightmare.
The Solution: Containerization
Docker packages everything together
Application binaries
Libraries and dependencies
Configuration files
All in one isolated container
Docker emerged as a solution. Instead of just packaging compiled binaries, Docker packages everything: the binaries, the libraries, the configuration files—all into a single unit called a container. The Docker platform on your machine runs these containers in isolation from each other, preventing conflicts. This is a fundamental shift in how we think about deployable units.
Benefits of Containerization
Better development experience
Focus on real problems, not environment setup
Easier collaboration
Every developer has the same environment
Project isolation
Switch between projects without conflicts
Simplified deployment
Same container works in development and production
The benefits are immediate. You can focus on solving actual application problems instead of wrestling with environment setup. When collaborating, everyone runs the exact same environment. You can work on multiple projects on the same machine without conflicts. And the same container that works on your laptop works in production. This abstraction removes a huge class of problems.
Virtualization Background
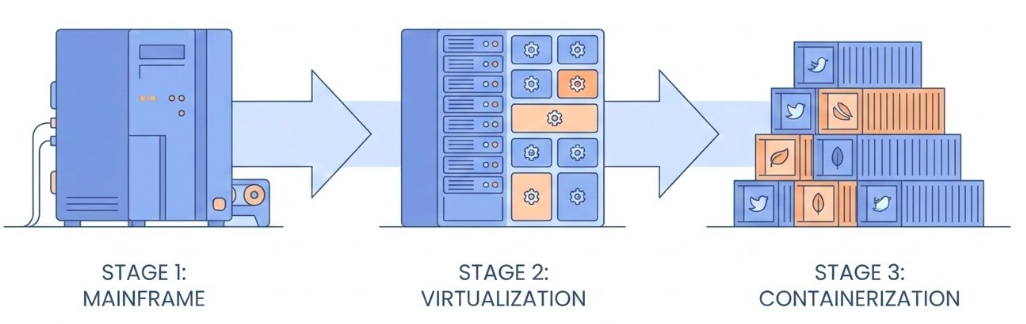
Virtualization (1966)
Dividing expensive mainframes into multiple virtual computers
Foundation of cloud computing
Containerization (2008-2013)
Internal project at dotCloud (France)
Open-sourced as Docker by Solomon Hykes (March 2013)
This didn’t come out of nowhere. Virtualization dates back to 1966, when expensive mainframes were divided into multiple virtual computers for better efficiency. That’s the foundation of cloud computing. Containerization evolved from this. It started as an internal project at dotCloud in France around 2008, and was open-sourced as Docker in March 2013 by Solomon Hykes. It’s a relatively recent innovation that’s become essential.
Dockerfile vs Image vs Container
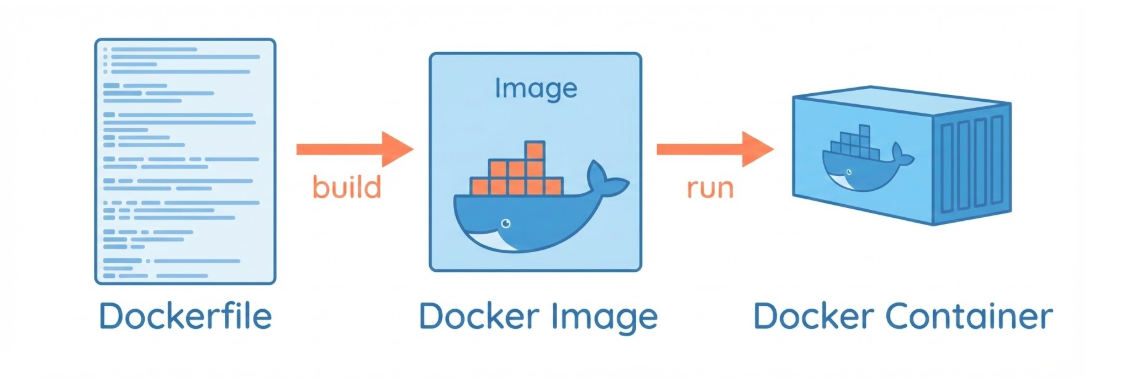
Dockerfile: A recipe for building a Docker image
Image: A template for creating a container
Container: A running instance of an image
Container vs Virtual Machine
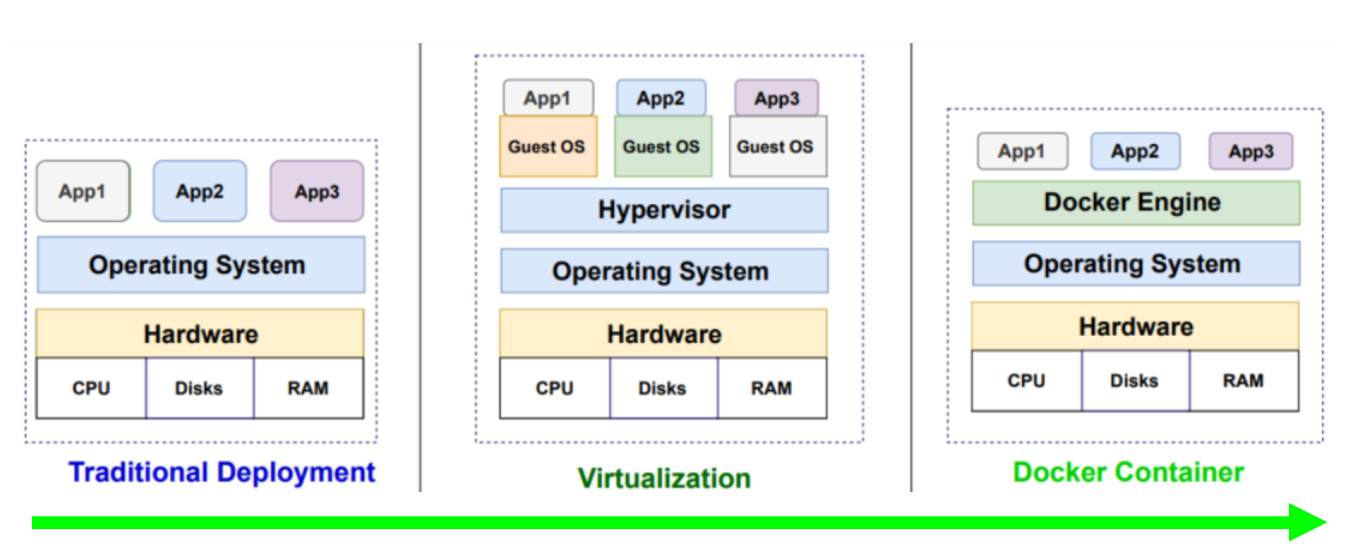
Both are isolated environments from an image
Difference: What the image contains
VM Image: includes a full operating systemContainer Image: shares the host OS kernel
Both containers and virtual machines provide isolated environments created from images. The key difference is what’s in the image. A VM image includes a full operating system. A container image shares the host OS kernel.
Containers are lighter
Less resource consumption
Faster startup/shutdown
Easier to manage
… this makes containers much lighter—they consume fewer resources, start and stop faster, and are easier to manage. For most applications, containers are the better choice.
Running PostgreSQL with Docker
Step 1: Create environment file (.env)
Now let’s get practical. First, we create an environment file to store our database configuration. This keeps sensitive information like passwords out of our code. We’ll reference this file in our Docker Compose configuration.
Docker Compose Configuration
Step 2: Define services in compose.yaml
services : db : image : postgres:17.6 env_file : - .env ports : - "5432:5432" volumes : - pgdata:/var/lib/postgresql/data volumes : pgdata :
Docker Compose lets us define our services in a YAML file. We specify the PostgreSQL image from DockerHub, point to our environment file, map the port so we can connect from outside the container, and most importantly, create a volume to persist data. Without the volume, all data would be lost when the container stops.
Understanding Docker Compose Elements
image: postgres:17.6env_file.env fileports: "5432:5432"volumes: pgdata
Let’s break down what each part does. The image tells Docker what to download from DockerHub. The env_file loads our configuration. The ports mapping lets us connect from our host machine. And the volume is critical—it stores the database data on the host filesystem, so it persists even when the container is destroyed. This is how we solve the data persistence problem.
Starting and Stopping
Start the database:
Stop the database:
Starting is simple: just run docker compose up. Docker will download the image if needed, create the container, and start it. To stop, use docker compose down. The data in the volume persists, so when you start again, your data is still there.
Connecting to the Database
Many Approaches:
CLI: psql (text interface)GUI: Adminer or VS Code Database ClientDB-API: psycopg driver and sqlalchemy frameworkMCP : DBHub (Bytebase)
Once the database is running, we need to connect to it. There are many approaches: the command-line tool psql, which is powerful but text-based, or graphical tools like Adminer or the VS Code Database Client extension, which are more user-friendly. The DB-API is what psycopg used by sqlalchemy framework implements. Finally, MCP allows agents to connect to the database and query and store data.
Part 2: Connecting the Application
The Question
How do I connect a Python application to the database to query and store data?
Answer: Use the psycopg package
Now that we have a running database, we need to connect our Python code to it. The answer is the psycopg package, which implements the DB-API 2.0 protocol. This is the standard way Python talks to PostgreSQL databases.
DB-API 2.0 Protocol
Standardized database interface in Python : fetchone(), fetchmany(), fetchall(), execute(), commit(), rollback(), etc.
psycopg implements this protocol for PostgreSQLWorks with other databases: SQLite, MySQL, etc.
The DB-API 2.0 is a standardized protocol for database access in Python. psycopg implements this protocol for PostgreSQL. The beautiful thing is that once you understand this protocol, you can apply the same concepts to other database drivers. The patterns are consistent.
Step 1: Import and Install
Install the package:
Import in Python:
First, we install psycopg using uv. The [binary] extra includes pre-compiled binaries for faster installation. Then we import it in our Python code. Simple enough.
Step 2: Create Connection
Connection string format (URI):
= psycopg.connect ('postgresql://user:password@localhost:5432/dbname' Or with parameters (conninfo):
= psycopg.connect (= ('user=user password=secret ' 'host=localhost port=5432 dbname=testdb' )
Creating a connection requires connection information: the user, password, host, port, and database name. You can provide this as a URI string or as individual parameters. The URI format is more compact and commonly used. Notice we’re using localhost and port 5432, which matches our Docker setup. The conninfo format is more verbose but allows for more flexibility.
Connection String Sources
Two places connection info can come from:
Environment variables (from .env file)Connection string parameters (URI or conninfo)
Both are checked by psycopg
It’s important to know that psycopg checks two places for connection information: environment variables and the connection string parameter. Some values might be set in your .env file, others in the connection string. If you’re having connection issues, check both places.
Step 3: Working with Data
Create a cursor (cur) from the connection (conn):
with conn.cursor() as cur:"SELECT name, age FROM users WHERE age > 18" )= cur.fetchall()
To interact with the database, we create a cursor from the connection. The cursor is our interface for sending commands and reading results. We use a context manager (the with statement) to ensure proper cleanup. Then we execute SQL commands and fetch results.
Why execute AND fetch?
According to the PEP 249 specification:
execute(): Submits the SQL to the database, parses it, and identifies the matching rows. The database creates a “result set” or a pointer (cursor) to those rows.fetch*(): These methods are the actual data transfer mechanism. They move the data from the database server/buffer into your Python environment as objects (tuple or list).
Reading Data
Four ways to fetch rows:
# Fetch one row = cur.fetchone()# Fetch many rows = cur.fetchmany(10 )# Fetch all rows = cur.fetchall()# Or iterate for row in cur:print (row)
For reading data, we have three main methods: fetchone gets a single row, fetchmany gets a specified number, and fetchall gets everything. The cursor is also iterable, so you can loop over it directly. For large result sets, be careful with fetchall—it loads everything into memory at once.
Writing Data
Using transactions:
with psycopg.connect (conn_string) as conn:with conn.cursor() as cur:"INSERT INTO test (num, data) VALUES ( %s , %s )" ,100 , "abc'def" )# Transaction commits automatically
When writing data, we use transactions. The connection context manager automatically handles this. If everything succeeds, it commits. If an error occurs, it rolls back. This ensures data integrity. Notice we use parameterized queries with %s placeholders—this prevents SQL injection attacks.
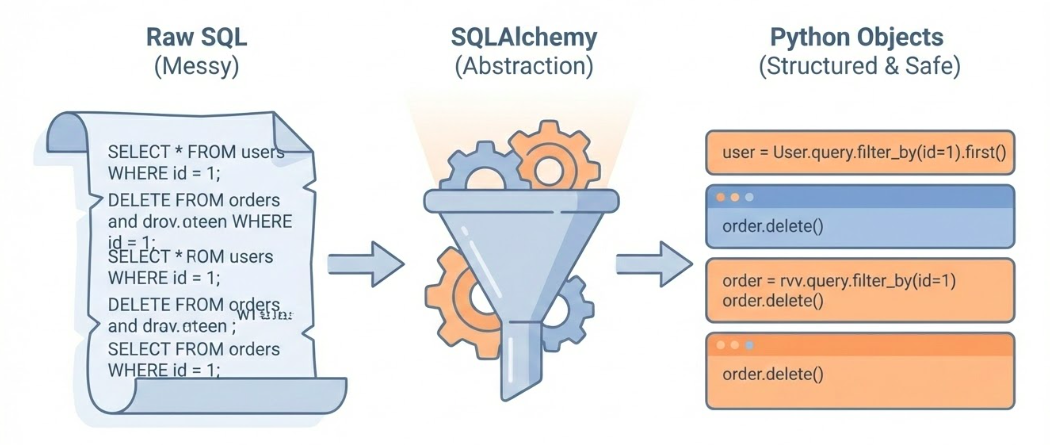
Problems with Raw Drivers
What psycopg doesn’t solve:
SQL written as strings (raw SQL) → typos, syntax errors
Parameter passing (not using placeholders) → SQL injection risks
Connection management (not using connection pooling) → expensive to create connections
While psycopg works, it has limitations. Writing SQL as strings means typos and syntax errors aren’t caught until runtime. Parameter passing can be error-prone. The code is database-specific, making it hard to switch databases. And creating connections is expensive—we need connection pooling. This is where SQLAlchemy comes in.
Part 3: SQLAlchemy Framework
What is SQLAlchemy?
Python’s most popular database framework
Raises database work to a higher level
Solves driver limitations
Two parts: Core ORM
SQLAlchemy is Python’s most popular database framework. It elevates database work from the low-level driver world to a higher abstraction. It solves all those problems we just identified: type safety, security, database portability, and connection pooling. SQLAlchemy has two main parts: Core, which we’ll focus on, and ORM, which maps database tables to Python classes.
The Engine
Central component: manages connections
from sqlalchemy import create_engine, URL= create_engine(= URL.create("postgresql+psycopg" ,= os.getenv("POSTGRES_USER" ),= os.getenv("POSTGRES_PASSWORD" ),= os.getenv("POSTGRES_HOST" ),= os.getenv("POSTGRES_DB" ),Usually a singleton (one per database)
The Engine is the heart of SQLAlchemy. It manages connection pooling—creating connections, keeping them alive, and reusing them. This solves the expensive connection creation problem. You typically create one engine per database, and it’s shared across your application. Notice the connection string format: “postgresql+psycopg” where postgresql is the dialect and psycopg is the driver.
Dialect vs Driver
Connection string: postgresql+psycopg
Dialect (postgresql): SQL language variant
Also: mysql, sqlite, mssql, oracle
Driver (psycopg): Low-level communication
Also: asyncpg, pymysql, pyodbc
Separation allows flexibility
The connection string separates dialect from driver. The dialect is the SQL language variant—PostgreSQL has different syntax than MySQL. The driver is the low-level communication library. This separation is powerful: you can use different drivers with the same dialect, or switch dialects while keeping similar code structure.
Creating Tables
Apply definitions to the database:
Translates to SQL:
CREATE TABLE users (id INTEGER NOT NULL ,VARCHAR (100 ),DATE ,PRIMARY KEY (id )
When we call create_all, SQLAlchemy translates our Python definitions into SQL DDL statements and executes them. This is much safer than writing SQL by hand—we get Python’s type checking and IDE support. However, this method is destructive and only suitable for development. For production, we need migrations.
Foreign Keys
Defining relationships:
from sqlalchemy.schema import ForeignKey= Table("user_emails" ,"id" , Integer, primary_key= True ),"user_id" , ForeignKey("users.id" ), nullable= False ),"email" , String, nullable= False ),
Foreign keys define relationships between tables. Here, each email must belong to a user. The ForeignKey constraint ensures data integrity—you can’t create an email without a valid user_id. SQLAlchemy handles the SQL translation automatically.
Inserting Data
Building insert statements:
from sqlalchemy.sql.expression import insert= (= "Adam Banana" ,= datetime.date(1990 , 1 , 1 )id )
Instead of writing INSERT SQL strings, we build statements using Python functions. The .values() method sets the data to insert. The .returning() clause gets back the generated ID. This is type-safe and prevents SQL injection.
Executing Statements
Sending to database:
with engine.connect () as conn:= conn.execute(stmt)= result.fetchone()= row[0 ]
We get a connection from the engine, execute our statement, manually commit the transaction, and fetch the result. The connection context manager handles cleanup. The result cursor works just like psycopg cursors, following the DB-API standard.
Selecting Data
Building SELECT queries:
from sqlalchemy.sql.expression import select= (id == user_id)with engine.connect () as conn:= conn.execute(stmt)= result.fetchone()
SELECT queries are built using the select() function. We reference columns using table.c.column_name syntax, which gives us autocomplete and type checking. The .where() method adds conditions. This is much safer than string concatenation.
Aggregations
Using SQL functions:
from sqlalchemy.sql.functions import count= (
SQLAlchemy provides functions for aggregations like count, sum, min, max. We use them in select statements and combine with group_by for summaries. All of this is type-safe and translates to correct SQL.
Raw SQL When Needed
SQLAlchemy allows raw SQL:
from sqlalchemy import text= text("SELECT name, salary FROM employees " "WHERE department = :dept AND salary > :min_sal" = conn.execute("dept" : "Sales" , "min_sal" : 50000 }
Sometimes you need raw SQL for complex queries. SQLAlchemy allows this through the text() function. Notice we still use parameterized queries with :parameter_name syntax. This maintains security by preventing SQL injection while giving us the flexibility of raw SQL when needed.
Part 4: Database Migrations
The Problem
Schema changes (CREATE TABLE, ALTER TABLE, DROP TABLE, …etc.) applied manually are dangerous:
data loss risk , hard to roll back (undo)not reproducible , out-of-sync between:
different environments (development, staging, production)
different developers working on the same codebase
not auditable , no history of:
what was changed
who changed it
when it was changed
why it was changed
We’ve been using create_all() and drop_all(), but these are destructive and only work for development. In real applications, we need to evolve the schema over time without losing data. Manual changes are dangerous—they’re not reproducible, hard to roll back, and environments drift apart. We need version control for our database schema, just like we have for our code.
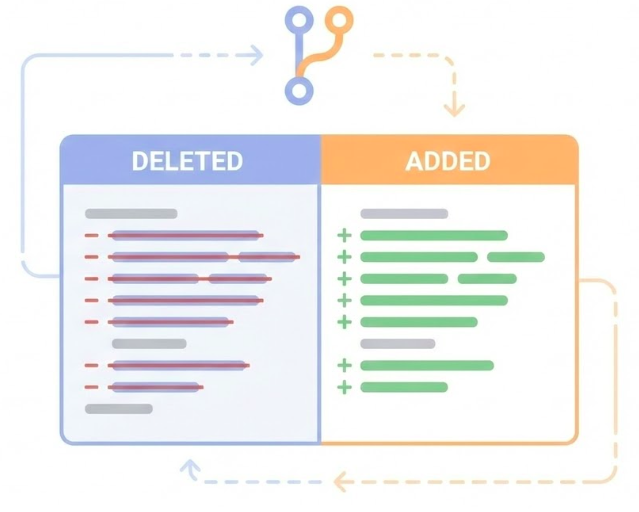
Version Control for Code
Git tracks code changes:
Line-by-line history
Time travel (undo)
Review before merging
Collaboration
We need the same for database schema .
We use git for version control of our code. It tracks every change, lets us travel back in time, requires review before merging, and enables collaboration. We need the exact same thing for our database schema. Every schema change should be a script that’s tracked in git, reviewed, and applied consistently across all environments.
Migration Scripts
Solution: Migration scripts
Each change is a script
Tracked in git
Reversible (up and down)
Applied automatically
Tool: dbmate
The solution is migration scripts. Each schema change becomes a script that’s tracked in git. Each script has an “up” direction (apply the change) and a “down” direction (reverse it). These scripts are applied automatically, ensuring all environments stay in sync. We’ll use dbmate, a simple and effective migration tool.
Installing dbmate
On Linux:
sudo curl -fsSL -o /usr/local/bin/dbmate \ sudo chmod +x /usr/local/bin/dbmate
dbmate is a single binary, making installation straightforward. We download it, make it executable, and it’s ready to use. It reads the DATABASE_URL from environment variables or a .env file.
Configuration
Set DATABASE_URL in .env:
dbmate reads this automatically
dbmate looks for a DATABASE_URL environment variable. We can set it in our .env file. The format is a standard database URI. Notice the ?sslmode=disable parameter—we’re disabling SSL since we’re running locally. dbmate will read this automatically.
Creating a Migration File
Generate new migration file:
dbmate new "add_users_table" Creates a file with two sections:
-- migrate:up


-- migrate:down
To create a migration, we run dbmate new with a descriptive name. This creates a new migration file with two sections: migrate:up for applying the change, and migrate:down for reversing it.
Writing the Migration SQL
We write the SQL for both directions. This ensures we can always roll back.
-- migrate:up CREATE TABLE users (id SERIAL PRIMARY KEY );-- migrate:down DROP TABLE users;
Applying Migrations
Run pending migrations:
Roll back last migration:
Check status:
To apply migrations, we run dbmate up. It checks which migrations have been applied and runs only the new ones. To roll back, we use dbmate down, which reverses the most recent migration. We can check the status to see which migrations have been applied.
Version Controlled Migrations Workflow (1/2)
1. Create migration:
dbmate new "add_email_column" 2. Write up and down SQL:
-- migrate:up ALTER TABLE users ADD COLUMN email VARCHAR ;-- migrate:down ALTER TABLE users DROP COLUMN email;
Version Controlled Migrations Workflow (2/2)
3. Update Python models:
= Table("users" ,"id" , Integer, primary_key= True ),"email" , String), # NEW 4. Commit both together:
git add db/migrations/xxx_add_email_column.sqlgit add src/models.pygit commit -m "schema: add email column to users"
Here’s the professional workflow. We create a migration, write both the up and down SQL, update our Python models to match, and commit both the migration script and the model changes together in a single git commit. This keeps everything in sync. If someone pulls this commit, they get both the migration and the code that uses it.
1. Database Setup
Containers solve environment problems
Package everything together
Isolated from conflicts
Same environment everywhere
Docker Compose simplifies orchestration
Define services in YAML
Volumes persist data
One command to start/stop
Let’s recap what we’ve learned. Containers solve the environment problem by packaging everything together in isolation. Docker Compose makes it easy to define and run our database with a simple YAML file. Volumes ensure our data persists even when containers are destroyed.
2. Database Connections
DB-API 2.0 is the standard
psycopg implements it for PostgreSQL
Patterns transfer to other databases
Transactions ensure data integrity
Automatic commit/rollback
Context managers handle cleanup
DB-API 2.0 provides a standard interface for database access. psycopg implements this for PostgreSQL, and the patterns you learn apply to other database drivers. Transactions are crucial for data integrity, and context managers make them easy to use correctly.
3. SQLAlchemy Benefits
Type-safe database code
Python objects instead of SQL strings
IDE autocomplete and error checking
Connection pooling
Reuses expensive connections
Better performance
Database portability
Switch databases with minimal code changes
Dialect handles SQL differences
SQLAlchemy elevates database work to a higher level. We get type safety through Python objects, connection pooling for better performance, and database portability through the dialect system. It solves all the problems we identified with raw drivers.
4. Migration Best Practices
Version control your schema
Every change is a script
Tracked in git
Reversible
Keep migrations and models in sync
Commit migration and code changes together
Ensures consistency across environments
Migrations are essential for professional database development. Every schema change becomes a versioned script that’s tracked in git and reversible. Most importantly, we keep our migration scripts and Python models in sync by committing them together. This ensures everyone’s database schema matches their code.
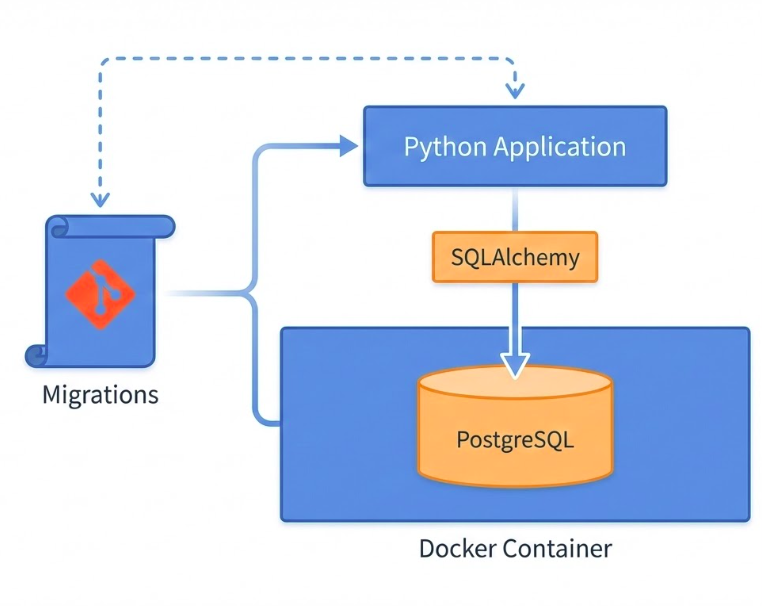
The Complete Picture
You now have a Professional workflow:
Putting it all together: we have an isolated database running in Docker, type-safe database code using SQLAlchemy, version-controlled schema through migrations, and a professional workflow that scales from development to production. This is the foundation for building real applications with persistent data storage.